Andy Smith
Mine action specialist |
| |
|
Developing safer demining tools
|
| |
Some of what follows was originally published in the JMU Journal of Mine Action long ago. That article reported on an R&D programme which led to the development of the first safer demining tools. This R&D programme was successful because it was not looking to win any design awards. It was trying to find improvements to tooling that could be shown to make the deminers’ work safer. The article introduced some AVS tool designs that are now used in many countries around the world by INGOs, military forces and commercial demining companies.
When I started I was trying to give people what they said they wanted. As I gained hands-on experience in the field and learned about accidents, I began to have ideas of my own about what was actually needed. By that time I knew that the people managing demining are rarely open to new ideas, only wanting equipment that looks reassuringly familiar no matter how inappropriate it may be. Hands-on deminers are often far more imaginative and I have enjoyed learning from them.
I always design something that I can make, then use it to ensure that it does what I want it to do. I usually have to make a few improvements before I am happy. By blowing up my tools, I learn about the way that materials respond to blast events and can ensure that the manufacturing method is optimised to keep the tool from separating or shattering. With a product that I can make myself, I can design a simple production process that should ensure that every one made is the same. Then I find a suitable small business and teach their people how to make the equipment.
I have never retained a commercial interest in what are 'technology transfer' exercises, so I walk away when my job is done. My designs are far too simple to protect with claims to IPR or patents, so they are free for anyone to use.
By retaining no 'interest', I can look at examples I come across in the field with a genuinely disinterested eye. Be warned, I have seen tools that look like my designs but that are poorly made or made using the wrong materials. These are NOT my designs and may have no blast resistance. It is the purchaser's job to ensure that the design rules explained below have been followed when they purchase any equipment that looks like an AVS design. If the designs have been changed, the product should always be blast tested again.
These tools are not presented as a final 'answer' to the need. There is no doubt that they could be improved upon, at least ergonomically, and I challenge practical design engineers to do that.
Introduction
Towards the end of the last millennium I was working at designing, developing, demonstrating and testing Personal Protective Equipment (PPE) for demining that could be made at low cost. The original work was self funded and the last stage was supported by the US Government. I included safer demining hand-tools as an integral component of the personal protection offered to deminers because hand-tools really are PPE and the wrong tools really do increase deminer injury. I have revisited the challenge several times since publishing the results and have introduced new tools and variants.
My goal was to design blast-resistant tools that could always be made somewhere close to the place they were needed. I was able to use and test the products using real mines in Mozambique, Namibia, Angola, Zimbabwe and Afghanistan. Some have also featured in real demining accidents and performed well.

The picture shows a tool pressed against a PMD6 AP mine containing 200g TNT boosted by a little PE to hold an electrically initiated detonator in place. The 'arm' is a length of polycarbonate held at the right angle to the ground. The 'hand' is folded from the same polycarbonate and put inside a rubber glove. Fill the rubber glove with water afterwards and if it leaks you know that the 'hand' was struck by fragments. The mine was always covered with soil before being detonated so that the environmental fragmentation would be realistic.
My designs work well, but blast-resistant does not mean that the tool will not be damaged. Rather it means that the tool and its design should not add to the user's injury.
Inappropriate hand-tools maim and kill
Deminers frequently suffer severe injury when the tools they are using are unsafe or are used in an unsafe way. The tools fail either by being so short that the user’s hand is inside the most violently disruptive part of the blast, or by breaking up and becoming fragments when a detonation occurs. The way of using a tool fails when the tool is used in a way that is unnecessarily hazardous.
The picture below shows an inappropriate demining tool being used entirely irresponsibly. It was published on social media by an INGO in 2017, so showing how that experienced INGO's publicity people (and presumably their field controllers) have no idea about safe demining.
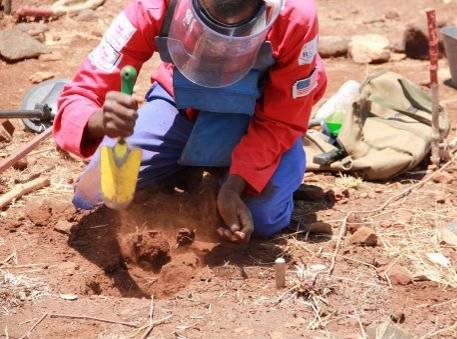
It is not only the users’ hands that suffer. Deminers have died after part of their hand-tool struck them. Parts of tools have so severely damaged the upper arm that amputation was needed. Parts of brittle plastic handles have pierced the user’s chest cavity. The separated head of a trowel has sliced the user’s face in half, inflicting injuries from which he later died. The mangled head of the yellow-handled garden trowel (shown below) was discovered inside a deminer's thigh after he arrived in hospital.

Some suppliers sell very expensive tools designed for use in demining that are manufactured in Europe and the USA. The most common are prodders made in separate lengths that screw together and are made from titanium or especially hardened steels. Popular with many ex-pat EOD men, these will probably not wear away in 100 years of use, but they will shatter in a blast event so adding sharp edged fragmentation to a blast threat. They are not blast resistant and not at all fit for purpose.
Prodding to locate mines is unsafe because it is not possible to probe to a reliable depth and because some mines will be initiated. The best military probe I know is the russian 'walking stick' probe that I was given in Afghanistan. What makes it good is the fact that the user's hands and head will be far enough away from an unintended detonation to avoid severe injury (as long as facial PPE is worn).
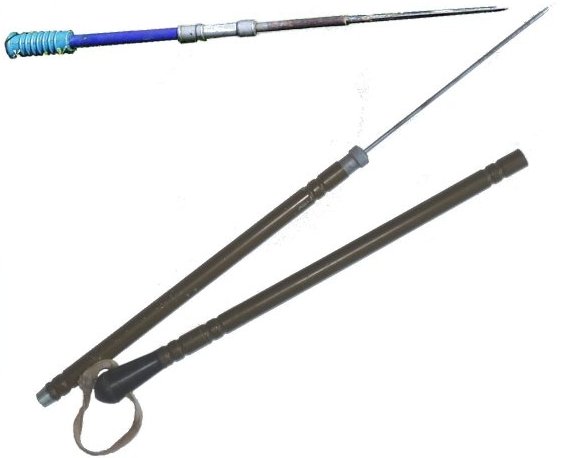
Some deminers in the Balkans use the shorter version shown above the Russian probe here. The Russian probe's handle screws together but far enough from the blast for the joint not to fail in a blast. Even with long probes that keep the deminer relatively safe, it is still true that it is impossible to prod to the required depth so searching with a probe will leave mines behind. I have records of deminers who have lost a foot stepping on ground they thought they had searched with a prod. I do not have records of similar civilian injuries but I know that they must have occurred.
Design rules
The following design criteria were adopted for making appropriate excavation tools. Tools used during other demining activities do not have the same requirements.
1. The user’s hand should be at least 30cm from the point of any excavation tool. Some argue that this is too long for the user to control. I suggest that they get on their knees and try because this is simply not the case.
2. The materials used must be sufficiently malleable for the tool to distort in any AP blast mine detonation.
3. The tool must be constructed so that it does not separate into component parts in any AP blast mine detonation. This usually means that the shaft must be taken right through the handle and welds must be applied to both sides with no undercutting.
4. The tool should be designed so that it is easiest to use at a low angle to the ground by a kneeling or squatting deminer, so encouraging the user to keep his/her hand beneath the fragment cone associated with many detonations. A long hand tool tends to achieve this by default.
5. Whenever practical, the tool should include a blast-guard for the hand using it.
It is not specified that excavation tools should be designed for one-handed use, but this is recommended in order to expose only one hand to risk. Also, probes designed for two-handed use put the 'guide-hand' too close to the blast and invite the use of excessive force.
The blast-resistant tools described here have also proved to be exceptionally hard-wearing which means they can be more economic that purchasing cheap and nasty tools. If you use these tools, you should budget to replace them once every five years, although I know that some of the first tools made are still in use after twenty years.
The materials I use are E304 stainless steel, Medium/High Density PolyEthylene (HDPE or MDPE), mild steel, polycarbonate and ballistic aramids. These are all inexpensive and widely available. Mild steel should only be used when stainless steel stock is unavailable. When mild steel is used, the parts should be galvanised or chromed to inhibit rust. I have found a wide range of stainless steel stock available in small boatyards and have sourced MDPE or HDPE by cutting them from cheap security guard nightsticks (the grip can then be turned on any lathe).
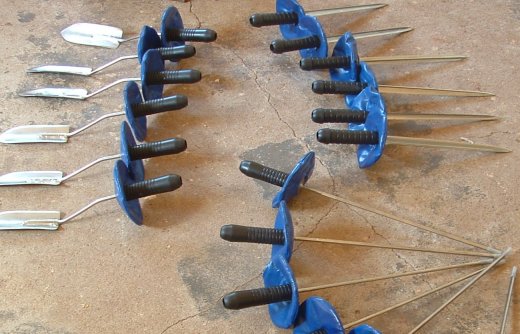
This picture shows some of the original tool designs photographed in Iraq recently.
For more on my design criteria, click here.
The pick-prod


The pick-prod before and after blast tests.
Made from “T” section steel, the pick-prod blade is 31cm long. It can be used to pick at the ground with considerable force without the blade bending. In softer ground, a twisting movement breaks up the ground more efficiently than a bayonet. The blade extends through the handle. Ground broken up with this tool should be removed using another tool.
The pick-prod weighs around 0.5 kg (1.2 lbs). In tests pressed against PPM-2, MAI-75 and PMD-6 mines, the blades distorted as intended.
The Pick-prod complies with the design rules in the following ways:
1. The user’s hand is at least 30 cm from the point of tool.
2. The material it is made from distorted (did not shatter) in AP blast mine tests.
3. The tool did not separate into component parts in AP blast mine tests.
4. The tool is easiest to use at a low angle to the ground when the deminer is kneeling or squatting.
To read more about the pick-prod, click here.
The MIT profile needle-probe
 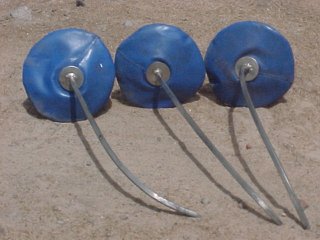
The MIT profile needle-probe before and after blast tests.
This tool is based on the common demining probe or 'prodder'. With a 40 cm-long blade, the shaft is 8mm stainless steel round bar that extends through the handle and has been reduced to 5.5 mm in one plane. The blade is almost oval in cross-section, but actually has flat sides as shown below.
The tool is designed to be used by pushing forward with one hand. The forward movement is followed by a rotating action which creates a round hole, so reducing ground friction by 50% in most soils.
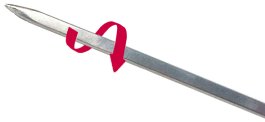
The reduction in friction allows a further forward push to move the tip deeper into the ground while using the same force. The 'oval' low-friction concept was published by a demining research group led by David Levy at MIT and adopted in this design, so is acknowledged in the name.
The complete tool weighs around 0.4 kg (12 oz). In blast tests, pressed against PPM-2, MAI-75 and PMD-6 mines, the probes distorted as intended. This design has also performed well in many actual demining accidents.
The MIT profile needle-probe complies with the design rules in the following ways:
1. The user’s hand is at least 40 cm from the point of tool.
2. The materials distorted in AP blast mine tests.
3. The tool did not separate in AP blast mine tests.
4. The length of the tool obliges a kneeling/squatting deminer to work with his/her hand at a low angle to the ground.
Because deminers tend to use their other hand to guide the blade no matter what I might think they should do, I designed a polycarbonate hand-guard for the user's second hand as shown below.
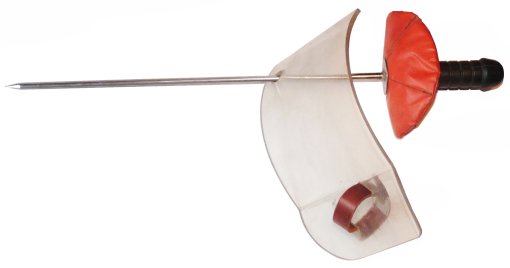
It has a leather and velcro wrist-strap and the probe blade passes through a hole in it. One hand pushes the probe while the other, protected behind polycarbonate, can guide the blade. The 5mm polycarbonate is actually part of a blast visor, so old visors could be recovered and used to make them. However, while I have two of these hand-guards, I do not think they have ever been produced and sold.
For more on the MIT profile needle probe, click here.
The demining trowel
The demining trowel is a tough variant on the gardening trowel that often features in a deminer’s toolkit. It is used to remove loose spoil and to excavate in soft ground. The shaft of the tool extends through the handle and keeps the user’s hand at least 30 cm (12 inches) from the tip of the tool. The demining trowel has now been in widespread use for twenty five years.

It is made using a malleable stainless steel head and a shaft which extends all the way through the handle. The handle is made of non-shattering MDPE . The user’s hand is protected by a small aramid hand-guard. The tool weighs around 0.7Kg (1.5 lbs).
The demining trowel complies with the design rules in the following ways:
1. The user’s hand is more than 30cm from the point of tool.
2. The tool is made using materials and methods that are proven to be AP blast mine resistant, distorting rather than shattering in a blast event.
3. The tool’s length makes it easiest to use at a low angle to the ground by a kneeling or squatting deminer. The complete tool weighs around 0.6 kg (16 oz).
The trowel is easily fitted with a clip-on neodymium magnet strip (fitting either side of the blade for left or right handed use). In trials this has been shown to make finding ferrous fragments among the spoil far easier.

The picture below shows how the shaft is secured in a recess at the end of the handle. This prevents the shock resisting MDPE handle separating in a blast event.
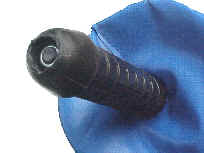
Read more about this tool here.
The two-handed excavator
Originally designed at MIT and based on the tools used to break-down doors, the two-handed excavator is designed to use minimum effort to exert
maximum force at a precise area on the ground. Because the tool is
not swung like a pickaxe, it is possible to apply the force with precision and so make it easy to start an excavation in hard ground.
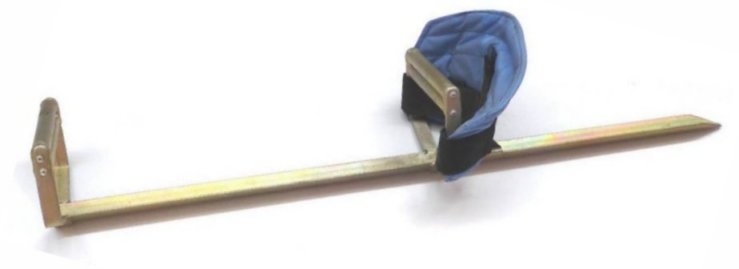
The tool is nominally 55cm between handles and has a 90 cm overall length. The hand-guard on the forward handle is designed to keep the leading hand safe in the event of a detonation.
Originally made using stock stainless steel angle-iron, flat bar and pipes, variants have been made using mild steel.
The two-handed excavator complies with the design rules in the following ways:
1. The user’s hands are more than 30cm from the point of the tool.
2. The tool is made using materials and methods that are proven to be AP blast mine resistant.
3. The tool’s length makes it easiest to use at a low angle to the ground by a deminer who is kneeling or squatting.
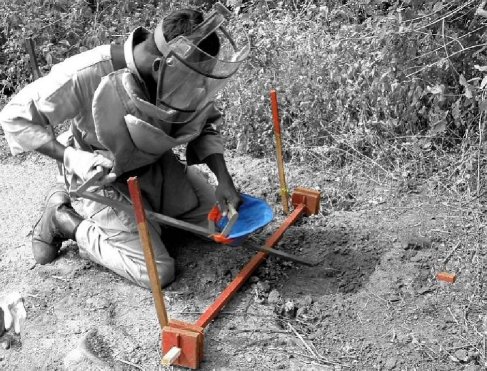
The photograph shows a deminer using the two-handed excavator. In hard ground, he has started digging well back from the red detector signal marker and can quickly and easily loosen the soil to the required excavation depth, then use other tools to crumble the ground into the excavation as he approaches the indication.
For more on the two-handed excavator, click here.
The one-handed excavator
The following pictures show the one-handed excavator before and after blast testing.


Designed as an alternative to the pick-axe or hoe that is commonly used in demining, this unconventional one-handed tool is used with a forward thrust, followed by a sideways sweep to remove the loosened spoil. The sideways sweep puts strain on the user’s wrist. To avoid this, the tool is extended so that a sideways movement is supported against the forearm. Starting well back from the metal-detector indication, the user digs a downward slope towards the indication, reaching the required excavation depth at least 15cm from the indication. If a mine is present (and horizontal), the side of the mine should be exposed.
The one-handed excavator folds in half for easy transportation as shown below.
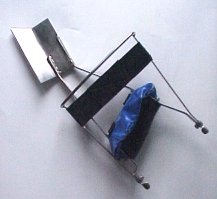
It weighs 0.9 kg (2 lb). In blast tests, the blade was distorted as intended and the metal structure, welds and fixings survived without visible damage. The fixings of the hand-guard were revised after the tests.
The one-handed excavator complies with the design rules in the following ways:
1. The user’s hand is 35 cm from the point of tool.
2. The materials used distorted in AP blast mine tests.
3. The tool did not separate into component parts in AP blast mine tests.
4. The tool is easiest to use at a low angle to the ground by a kneeling or squatting deminer. Like all long tools, it is virtually impossible for a deminer in that position to use them to dig vertically.
Read more about this tool here.
The demining brush
Soft paint brushes are commonly seen in demining tool kits. They are used to brush away the final soil sticking to the side of a mine or suspicious object. However, paint brushes are not designed for this purpose. They are far too short for safety, and their bristles are usually too soft to perform their function well.
The pictures below show a demining brush in use with the Chilean army, and after a blast test in which the brush was placed on top of a PMD-6.

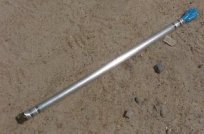
The demining brush is a 40-cm section of malleable stainless steel pipe with bristles set into both ends. A simple reversible hand-tool, the brush has stiff 'yard-broom' bristles at one end and softer 'hand-brush' bristles at the other. In blast tests, the bristles of the brush were placed on top of a mine. The bristles were burnt off.
The demining brush complies with the design rules in the following ways:
1. The user’s hand can be at least 30 cm from the point of tool.
2. The materials used in its construction either burnt or distorted in AP blast mine tests, presenting no additional risk to the user.
3. The tool did not separate in AP blast mine tests.
4. The tool’s length makes it easiest to use at a low angle to the ground by a deminer who is kneeling or squatting.
While the tool performed as designed, it may be preferable to add a disk to the centre of the stainless steel tube which would act as a hand-guard (providing protection whichever end was used).
To read more about this tool click here.
Demining rakes
Rakes have been used in demining for a long time but not always in procedures that were safe. The rakes shown here were designed to be used in the Rake Excavation and Detection System (REDS) pioneered by Luke Atkinson for NPA in Sri Lanka and Jordan. REDS uses two rakes, a 'heavy rake' and a 'light rake'. The
heavy rake is used first
and after it has broken the ground, a light rake
(or leaf-rake) is used to move the
loosened soil back to the base-line (which is a base-trench in an area excavation procedure).
Progress can be slow in hard
ground, but the method is thorough and equipment costs are very low.
The picture below shows three different heavy rake heads that I made in a roadside workshop in Sri Lanka while refining the REDS system. Rakes like this were fitted with 1.75 metre long wooden handles (cut from the jungle). The rake frequently lifted mines to the surface as shown.
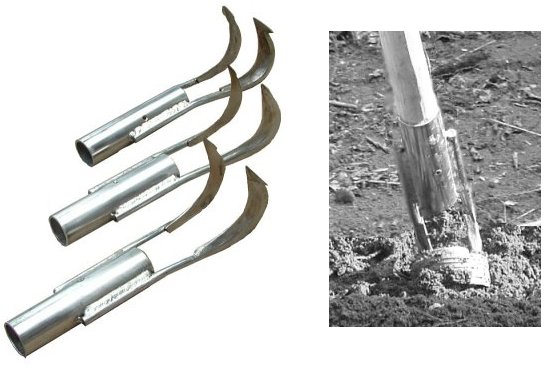
The light rake may also have a plastic head. A variant with the head angled as shown below was also popular.

Area excavation with rakes can be especially useful when there is ground contamination with metal or minerals, and when there is a need for low-cost, sustainable equipment
and methods to be used.
The saving on metal-detectors, batteries, servicing and training can make the use of a rake excavation system very cost effective when deminer salaries are low.
The variant heavy rake head design shown below has been made in Zimbabwe and used in Sudan and Libya. It is lighter and clamps to a length of stainless steel pipe to replace the wooden handle.

The distance between the tines of the heavy rake can be varied but should be closer together than the smallest dimension of the mines being sought This helps to lift mines to the surface and should prevent any mine becoming jammed between the tines.
I recommend that the two tines of the heavy rake are made using 10mm stainless steel round bar with flat feet that are designed so that the tines do not enter the ground if the rake-head is banged down onto the surface. The accident record shows that ‘hacking’ at the ground to make the tines penetrate may cause a detonation. The heavy rake head should be placed onto the surface gently and then pulled back towards the user. The shaped feet dig into the ground automatically, ploughing as they are pulled through the ground.
See the REDS excavation system, the Rake Case Study, and the detailed use of rakes described in Chapter 6 of the Global SOPs.
The mine-grab
At one time I was asked to develop a means of picking up mines that had been deposited on the ground surface by a machine. The mines were to be moved to demolition pits for destruction The mine-grab was the result.

The Mine-grab is a two-handed tool with the weight supported by the right forearm. The left hand holds the steadying handle; the right hand rests in the support and pulls the trigger to grip the mine. The grabbing head is angled so that the mine can be approached from the side while the user stands upright.

The tool can be used to position and pick up mines with relative ease, then carry them to a collection point. The tool keeps the mine over a metre away from the person carrying it. If the users have frontal body protection and blast visors, they should survive a small AP blast detonation without serious injury. I recommended using frontal leg protection to extend frontal blast protection to the ground.
In tests, I detonated a VS50 mine in the jaws of the grab. The polycarbonate jaws were entirely burned but the shaft and the handle were unmarked and no fragments of the jaws struck the dummy 'user'. The tools were widely used to pick up damaged R2M2 mines over an extended period but none detonated while being moved so the tool was not 'tested' in any accidental detonation.
For more about this tool, click here.
Magnets
When using a metal-detector it will signal on all metal, most of which is usually small pieces of ferrous material on or near the ground surface. I have seendeminers using old speaker magnets that had very little magnetic power so which often failed to attract the scrap. By folding small, strong and light neodymium magnets in a thin steel sheet, I made the magnet clips that are used with the long demining trowel.

By taping (or shrink-wrapping) the same small magnets onto a strip of 5mm polycarbonate that is then bent into shape and a foam handle fitted, it is easy to make the magnet-wand shown below.

This can be passed over the place where the metal-detector indicated while keeping your hand a long way away. It is also powerful enough to 'suck' metal from the ground and can even lift a fragmentation mine (not recommended, of course).

Markers
I always use the simple polycarbonate markers shown here. They are cut from 1mm polycarbonate sheet with scissors. Colour is painted on and can be 'fixed' by heating the item to 130C.
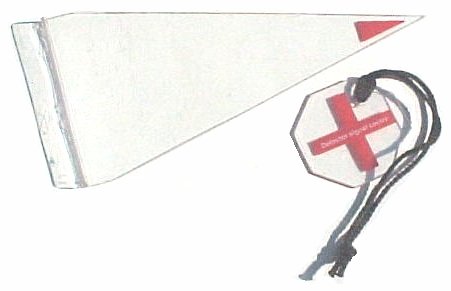
The triangular one is bent at one end so that it is easy to pick up (thin polycarbonate can be bent by hand). It is 20cm long, so indicating 20cm from an indication and the place where I would start the excavation of a small AP blast mine. The red cross marker is placed on top of the signal indication. It is thin enough for me to move the detector's search-head over it to check its position. The string allows it to be rapidly picked up, and to be easily found in my pocket.
My tool kit
As stated above, if I can use my rakes to excavate, I always would. My favourite tool for excavating on my knees is an 18" Lee Enfield bayonet that I was given by a deminer twenty five years ago. In several real accidents, these have always bent and not shattered. I once tried to replicate it, but I lacked the skills to do that in a small workshop. The picture below shows the tools I use myself. The Lee Enfield bayonet, my detector signal markers, the demining trowel (with magnet clip), the MIT profile probe, the demining brush, the pick-prod, the MIT two-handed excavator and the magnet wand.
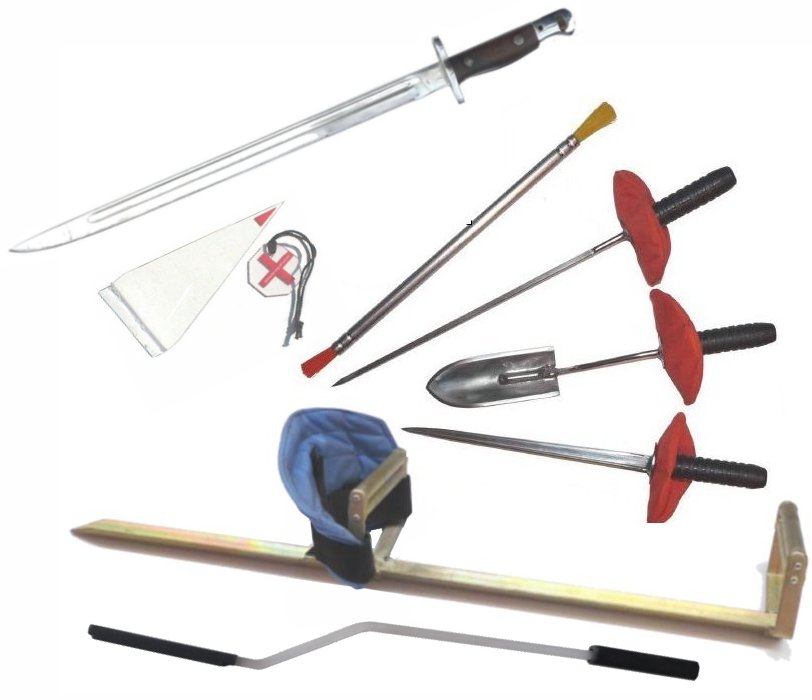
I add good quality off-the-shelf wire-cutters, anvil secateurs, a lump hammer, shears and a one-handed vegetation saw. A battery tester, small flashlight and multi-tool Leatherman complete my basic kit, which I would significantly extend if there may be active IEDs around.
When I started, I also made training mines but that was a lot of trouble and I found that it was better to use real mines from the area that had been made safe. That said, my training mines were so popular that they all 'disappeared' which may indicate a need, or it may have just been tea-leaf kleptomania.

These are the same size as Type 72 AP mines and took the same pressure to 'click through', but they are the wrong colour and only had the correct metal content when I took that metal from a real mine.
See also my work developing body armour for demining, developing face and eye protection for demining, and on disrupters. For a more complete story of my work in HD and HMA, click here.
Acknowledgements
The following people have provided practical help in my hand-tool work: Matthew Smith, Raju Pillai, Luke Atkinson, Matthew Chambers, Ken O'Connell, Christopher Marizani, Cosmos Mutemba, Cris Chellingsworth and Washington Mbundire. Many deminers and demining managers have also helped to get things tested and offered design advice. Thanks are also due to the late Beverly Briggs and retired Colonel George Zahaczewsky from US ARMY CECOM NVESD who first accepted that tools are PPE and allowed me to give them the priority that they deserve.
HOME
|
|